
Create an Account
Create an account for powerful AI tools, award-winning courses, and access to our vibrant community.
or
Already have an account?
Create an account for powerful AI tools, award-winning courses, and access to our vibrant community.
Already have an account?

2022 Game of the Year Elden Ring is a daunting challenge for even the most experienced gamers. Luckily, as with previous FromSoftware titles, the player has the ability to summon up to two cooperators to aid them in their journey throughout the Lands Between. While build variety is encouraged, some players may find it more immersive to structure their co-op builds to synchronize with those of their allies.
Part roleplay creation, part loadout advice, these are high-level endgame builds, so try grabbing some of the related spells and weapons early in the game as to maintain the immersion. Alternatively, you can wait until NG+ and start fresh with all of your magic and gear already in your possession. All stats were created using the Elden Ring Build Calculator in order to verify the viability of medium rolls. Visuals were generated with the nifty Elden Ring Fashion Planner, a useful tool for envisioning your Tarnished’s look ahead of time.
In terms of set up, an effort is made to give each build access to dual wielding, one hand and shield, and two-handed weapon stances (thank you, Elder Scrolls Online), along with access to their respective magic types, although this can vary by character. For instance, the Black Knife Assassin trades in her shield for a bow. Additionally, many of these are caster builds meant to maximize DPS, meaning the Scorpion, Godfrey's Icon, Shard of Alexander, Flock's Canvas, and Graven Mass talismans appear often. To avoid repetition, we will assume these talismans are part of each build unless stated otherwise. Finally, where a character is seen dual-wielding a weapon that is only attainable once per playthrough, it is assumed to have been given by one of your cooperators from their world, which is a massive advantage of playing with friends.
Grab a seat, relax, and enjoy these eight triumphant trios that will make your Elden Ring squad more than a random assortment of warriors.
A unique take on the classic necromancer, vampire, and werewolf trio, the Undead War Party introduces some classic dark fantasy to the Lands Between. From the depths of the roots far below Leyndell, a Lich Knight of Godwyn stirs. A powerful necromancer, this black-armored warrior employs Death Sorceries to decimate the souls of her foes. The great necromancer is joined by a being known as the Blood Matron, an envoy of the Formless Mother, her outer god. Fighting alongside the Lich Knight, the vampiric Blood Matron is an abhorrent exile who is reviled by all but the dregs of society. The pair are accompanied by the chosen of Serosh and champion of the beastmen, a ferocious half-wolven warrior given human intelligence.
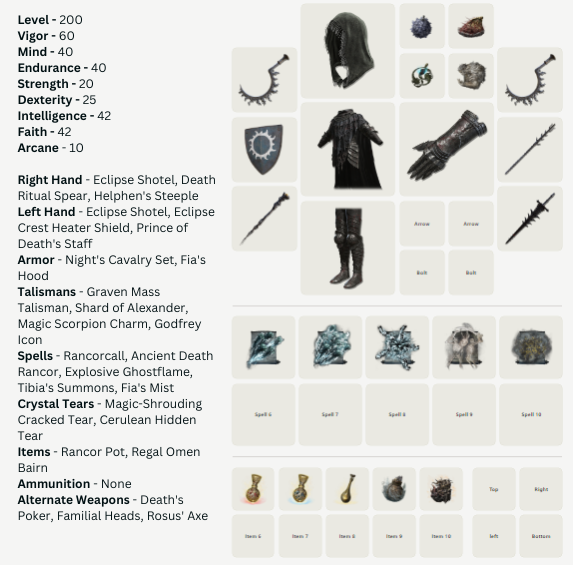
In order to make effective use of death magic, the Lich Knight operates as an Intelligence/Faith hybrid. Nearly the entirety of her equipment is found in various areas of the Mountaintops of the Giants. Consider grabbing Rosus' Axe in the Weeping Peninsula as a sweet undead-themed starter weapon. The Eclipse Shotels, the legendary armament of Castle Sol, serve as a swift, high-damage dual-wield option that is strengthened by its Death Flare weapon skill. For harder-hitting enemies, feel free to switch to your Eclipse Heater Shield, conveniently paired with your Death Ritual Spear. Wielded by the priests who served the Death Rite Birds, the spear provides one of the most potent AOE weapon skills in the game. In contrast to the shotels, Helphen's Steeple coats the weapon in ghostflame, which, on top of the extra damage, applies the frost status effect. The Lich Knight is a terror in battle, and Fia's Hood pairs excellently with the Night's Cavalry Armor for an ensemble worthy of a dark warrior of Godwyn.
The frost effect is also complemented by the Lich Knight's Death Sorceries: Rancorcall, Ancient Death Rancor, and Explosive Ghostflame. In the Crystal Tear department, the Magic-Shrouding Crystal Tear increases the innate magic damage of all the player's weapons and spells, while the Cerulean Hidden Tear briefly eliminates all FP consumption from spells and skills.
The Lich Knight plots with the Prince of Death to travel to Farum Azula and retrieve Destined Death, so that they may bring about the Age of the Duskborn.
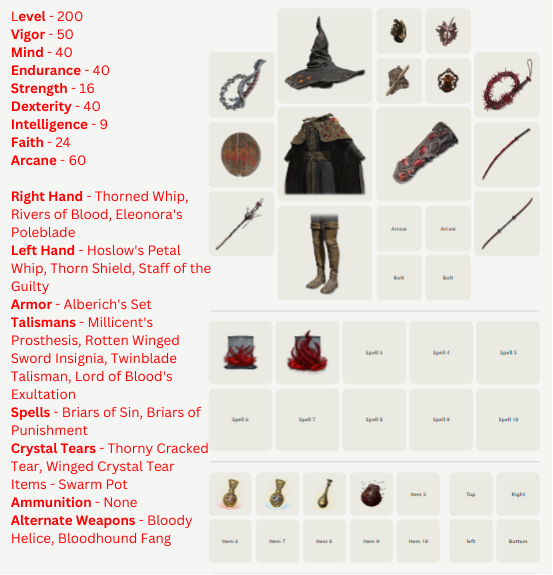
As a blood sorcerer, the Matron is primarily an Arcane/Dexterity build. In battle, the Blood Matron utilizes the hemorrhage status effect to deal frequent burst damage against lightly armored adversaries. The Thorned Whip pairs nicely with Hoslow's Petal Whip, especially with running and jumping attacks. Rivers of Blood, the crimson katana of the Bloody Finger Okina, is well known among the Elden Ring community, and despite the criticism, it is heaps of fun to use and fits the build's aesthetic nicely. Her two-handed weapon, Eleonora's Poleblade, has a wicked weapon skill that excels in one-on-one combat. In addition to increasing the damage of Aberrant Sorceries, the Alberich Set is a damn cool-looking armor fit for a bloody outcast.
The Lord of Blood's Exultation talisman increases the user's attack power for twenty seconds every time blood loss occurs. Two of the remaining three talismans also boost damage done with successive attacks, while the Twinblade talisman raises damage on only the final hit of a chain attack. The Aberrant Sorceries, Briars of Sin and Briars of Punishment, cast a spiral of blood thorns from a distance, making for an effective long-range option. This build encourages a highly aggressive playstyle that can result in tremendous damage output, so long as the player is able to dodge effectively.
The Blood Matron seeks a duel with the Bloody Finger Okina and journeys to the Church of Repose to test her mettle against the sword master.
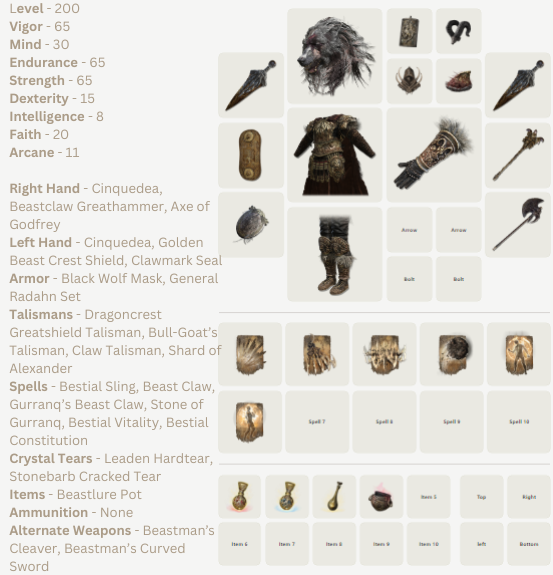
The Half-Wolf operates as a pure Strength build, relying on vast amounts of health, stamina, and defense to supplement his heavy-hitting weaponry. Dual Cinquedea daggers serve as an option to rapidly dispatch weaker enemies. It also doubles as a conduit that amplifies the player's Bestial Incantations (more on those in a minute). The Beastclaw Greathammer and Golden Beast Crest Shield are both artifacts of the Beast Lord Serosh. The hammer's weapon skill, Regal Beastclaw, deals devastating physical damage against both singular opponents and groups. The Axe of Godfrey, the once Elden Lord whose bloodlust had to be contained by the Lord of Beasts, operates as the half-wolf's two-handed option, dealing massive physical damage and breaking defenders' guards with ease. To continue with the theme, Radhan's Set was forged to symbolize the beast regent Serosh, further solidifying the warrior as the champion of Farum Azula. Where the Blood Matron encourages dodging and speed, the half-wolf emphasizes heavy protection and damage trading.
With the Dragon Greatshield and Bull-Goat's Talismans greatly increasing defense and poise, the half-wolf can take long-winded swings at combatants while brushing off incoming damage. The Beastial Incantations channel the strength of Gurranq, the Beast Clergyman, tearing and rending through adversaries with beast claws. The Stone of Guranq is a decent enough medium-range option for a melee build, and Gurranq's Beastclaw can shred through ranks if the player can manage to get it off in time.
The Half-Wolf longs to rejoin his kin in his ancestral home, the floating city of Farum Azula.
In the southern parts of the Lands Between, an unlikely alliance of fire, frost, and lightning is forged. Three Elemental Battlemages have joined forces out of necessity. A Fire Monk, stranded in Liurnia after retrieving a stolen fragment of the ruinous flame, aims to return to the lofty Mountaintops of the Giants. The Snow Witch, a frostbitten sorcerer and leader of the Zamor, was imprisoned in the Weeping Peninsula alongside one of her knights. Once ancient enemies, the envoys of flame and frost have set their differences aside to work towards a common goal: traversing the many perils of the Lands Between and returning to the place they each call home. Their Dragon Priestess ally, slayer of Godrick the Grafted and lord of Stormveil Castle, would round up the remaining Dragon Knights of Leyndell before conducting a pilgrimage to the fabled city of Farum Azula.
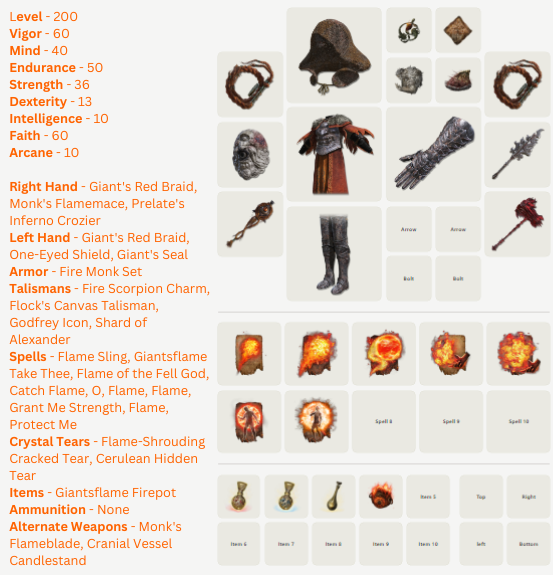
The Fire Monk dual-wields a flame-infused whip constructed from the red braid of the last Fire Giant. The armament scales well with both Strength and Faith, offering a steady blend of physical and fire damage. Its weapon skill, Flame Dance, ignites the weapon and lashes out repeatedly in a large radius, making it great for dispatching scores of hostiles. The Monk's Flamemace, a staple among his order, is an excellent bludgeoning weapon that the player can imbue with various Ashes of War. In the left hand, he carries the One-Eyed Shield, made of white stone as a tribute to the Fell God. The shield has immense stability, and its Flame Spit weapon skill can obliterate enemy clusters. The Prelate's Inferno Crozier, a colossal warhammer given to high-ranking Fire Monks, is a destructive weapon that is only enhanced by its weapon skill, Prelate's Charge. In terms of fashion, you can't go wrong with the classic Fire Monk Set, with the eye of the Fell God resting proudly in the chestpiece as a sign of the pyromancer's faith.
For talismans, the Fire Scorpion Charm is a must for increasing all flame damage, while the Flock's Canvas Talisman augments the potency of the monk's incantations. Furthermore, the Godfrey Icon increases the power of all charges spells and skills, effectively synchronizing with Flame Sling, Giantsflame Take Thee, and O'Flame. After boosts from Flame, Grant Me Strength, which further augments both physical and fire attack power, the Fire Monk can reach insane levels of damage output that will incinerate all that stand in his way.
Once he reaches the Mountaintop's peak, the Fire Monk would rekindle the Flame of the Fell God and take revenge on the followers of the Erdtree for the fire giants' genocide.
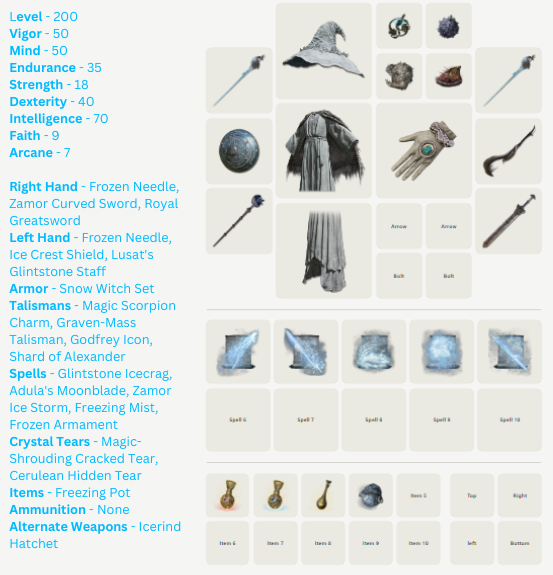
In contrast to the primal destruction of the Fire Monk, the Snow Witch harnesses the power of both Dexterity and Intelligence. She brandishes a Frozen Needle in each hand, found early in the Kingsrealm Ruins in Liurnia. The Zamor Curved Sword, the storied weapon of her people, has a ruinous AOE weapon skill that inflicts frost effects with ease. While it doesn't look like much, the Ice Crest Shield can reach up to 70% magic damage negation when infused, and it provides a passive boost to Robustness, which dictates your bleed and frost resistances. Not to mention that it looks awesome. The Royal Greatsword, acquired from Blaidd the Half-Wolf at the end of Ranni's questline, has a surprisingly low Strength requirement for a colossal sword, and its Wolf's Assault weapon skill is lethal against both singular targets as well as hordes. Lusat's Glintstone Staff boasts stellar Intelligence scaling, but at the cost of an FP increase per cast. The Snow Witch Set looks superb for a frigid sorcerer, with the hat providing a boost to her frost-themed sorceries.
While the Snow Witch does not have many charged abilities, the Godfrey Icon is worth it for Zamor Ice Storm alone. Glintstone Icecrag operates as her go-to spammable spell, while Adula's Moonblade is a quicker, close-range option that can dispatch multiple attackers simultaneously. The secret to this build is working in unison with the Fire Monk. Once the Snow Witch initiates the frost effect, attacking with fire damage causes the buildup to reset, allowing a constant cycle of heavy burst damage and weakening bosses resistances.
Released from her prison, the Snow Witch sets her sights upon the icy Mountaintops to learn what, if anything, remains of her people.
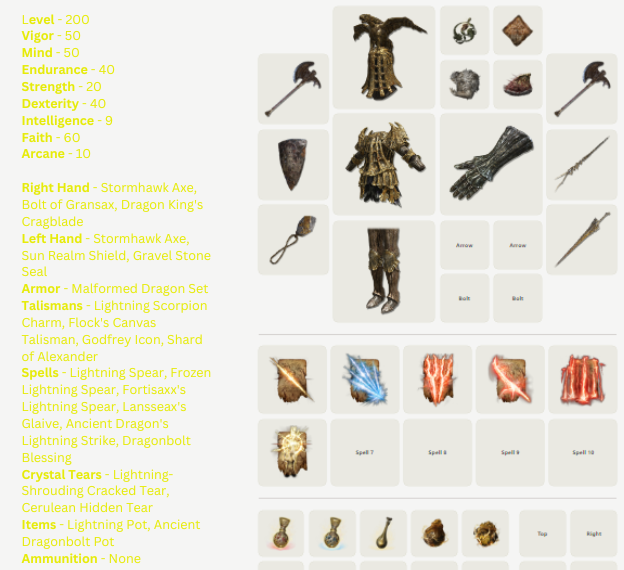
The Dragon Priestess, a member of the ancient dragon cult, is primarily a Faith build with some dexterity mixed in. She brandishes a Stormhawk Axe in each hand, an electrifying weapon fitting for a warrior of lightning. The Bolt of Gransax, a powerful spear located in Leyndell, possesses a potent weapon skill whose range nearly equals that of many bows. Her final weapon is the Dragon King's Cragblade. Forged from the remembrance of Placidusax, the heavy thrusting sword has a unique weapon skill that transforms the Dragon Priestess into a thundercloud before plunging into enemy war bands. Her magical conduit, the Gravel Stone Seal, is specially attuned to raise the power of Dragon Cult Incantations. She is protected by the Malformed Dragon Set, the armor of the Tree Sentinels, who united with the Dragon Cult after the ancient dragon Gransax laid siege to the Royal Capital.
The Godfrey Icon reinforces the charged attacks of the Ancient Lightning Spear weapon skill, unique to the Bolt of Gransax, along with the Ancient Dragon's Lightning Strike incantation. The remaining incantations are all variations of the original Lightning Spear, with the frozen variant acting as supplementary frost buildup with the Snow Witch's sorceries.
In the Crumbling Lands, beyond the constraints of time, a Dragonlord is said to reside, awaiting a harbinger of the storm to bring about the return of the Age of Dragons.
The denizens of the Lands Between are not alone in the universe. The Full Moon, an outer god and rival of the Greater Will, has agents in this world that work to push its goals further. Celestial Sorcerers, gifted wizards all, scour the night sky for sources of magical energy. Of these agents, the Moon Knight stands above all. A powerful spellsword, she is head of the Carian forces and protector of the Liurnia of the Lakes region. The Stargazer, a hedge wizard and researcher of glintstone, aids in their quest in the hopes that this new age will allow him to glimpse into the phenomenon known as the Primeval Current. The two sorcerers are accompanied to the Lands Between by a stranger. The Voidwalker is an intergalactic traveler capable of gravity manipulation magic.
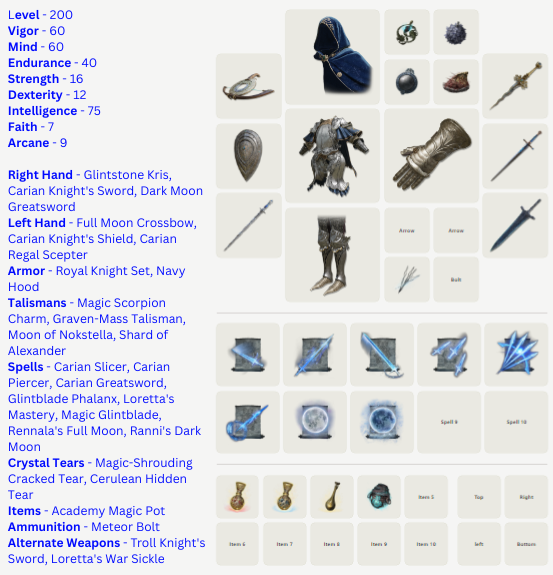
Part scholar, part warrior, the Moon Knight is as pure an Intelligence build as you will find. The Glintstone Kris, given to her by the Sorceress Sellen, is a light, effective option with a surprisingly strong weapon skill. In her left hand, she clutches the Full Moon Crossbow, an enchanted weapon crafted to commemorate the union between Radagon and Rennala. The Carian Knight's Sword and Shield are essential for this build and really complete the spellsword aesthetic. The blade's weapon skill, Carian Grandeur, creates a magical greatsword that slams vertically into opponents, producing massive damage when fully charged. As a reward for her aid in overthrowing the Two Fingers, the Moon Knight was bestowed the Darkmoon Greatsword, a legendary armament blessed with the light of her outer god. The Carian Regal Scepter, arguably the mightiest staff in the Lands Between, enhances the power of the knight's Full Moon Sorceries. Similar to Loretta, the Moon Knight dons the Royal Knight Set, conserved for Carian Knights of the highest prestige.
The equipment is awesome for roleplaying, but where this build really shines is its magic. The Carian Slicer, Carian Piercer, and Carian Greatsword all produce magical blades of varying speeds and sizes. The slicer in particular is an amazing spammable option with its combination of speed and damage. For long-distance combat, Loretta's Mastery has excellent range and can deplete enemy health bars prior to the start of melee fighting. Of course, she is the Moon Knight for a reason, making both Rennala's Full Moon and Ranni's Dark Moon essential for this build. Specifically, the Full Moon reduces enemy magic negation for a time, while the Dark Moon builds up the frost status effect, a perfect pairing with the Darkmoon Greatsword's weapon skill.
Together with Lunar Princess Ranni, the Moon Knight is determined to rid the world of the Two Fingers and the influence of the Greater Will. In their place, an Age of Stars will commence, with the Full Moon ushering in an era of the chill night sky.
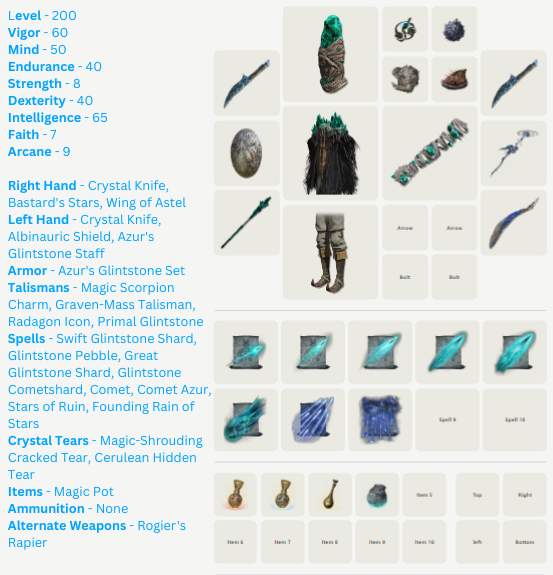
An astrologer and scholar of the stars, the Stargazer draws upon a mixture of Glintstone and Primeval Sorceries in this high-octane Intelligence build. While originally a miner's weapon, the twin Crystal Knives have a B scaling in Intelligence when fully upgraded, making them an efficient option against smaller adversaries. For heavier armored assailants, the Bastard's Stars flail deals heavy strike damage, and its Nebula weapon skill performs a sweeping strike, leaving behind a trail of exploding stars in its path. The Wing of Astel has a similar star theme, and its strong attack functions as a ranged option that costs zero FP. In his left hand, the Stargazer grasps tightly onto Azur's Glintstone Staff, which reduces the casting time of all sorceries, albeit at the cost of additional FP consumption. Azur's blue-green glintstones also coat his armor, with the crown replacing the Stargazer's mind all together.
The Stargazer's talisman setup is identical to that of his Moon Knight companion, with Glintstone Cometshard and Comet both benefiting from the boost to charged attacks. The remaining three Glintstone Sorceries deal varying amounts of damage at different FP costs, allowing the Stargazer to be selective in how much of the precious blue mana he wishes to spend per enemy.
The Stargazers consider the Primeval Current to be the source of all glintstone, its power rivaling even that of the outer gods. Perhaps that is why he will stop at nothing for just a glimpse.
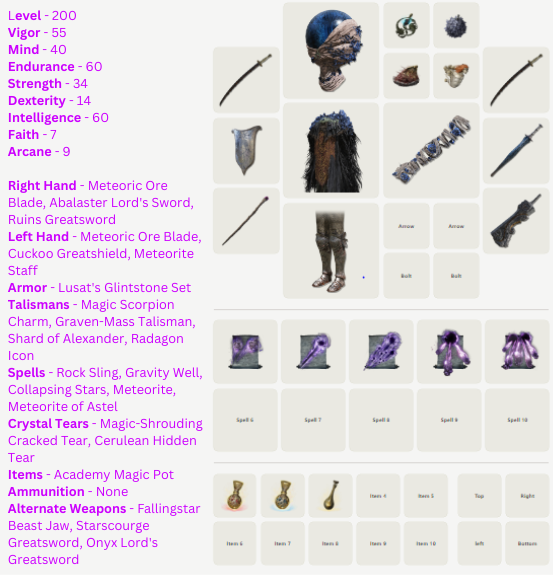
Intergalactic sorcerer and ally of the Alabaster and Onyx Lords. The Voidwalker dual-wields the Meteoric Ore Blade, a katana that scales with both Strength and Intelligence. Its weapon skill, Gravitas, is a weaker version of the Alabaster Lord's Pull, belonging to the greatsword of the same name. His two-handed weapon, the Ruins Greatsword, is a legendary armament forged from the rubble that fell from the sky after being struck by a meteor. Wave of Destruction, its weapon skill, launches a wave of gravitational force, dealing significant physical damage to all it impacts. His Meteorite Staff, embedded with a dark purple glintstone, is said to be a fragment of a meteorite and enhances the strength of Gravity Sorceries. Arriving in the Lands Between with minimal means of protection, the Voidwalker looted the blue glintstone armor of the sorcerer Lusat from deep within a cave in the Caelid Wilds.
In terms of magic, the Voidwalker's Gravity Sorceries hurl meteors at opponents and open portals to the great beyond. The meteorite of Astel opens a void that emits a hail of meteorites continuously until the user runs out of either stamina or FP. This is a devastating spell that, if used correctly, can be on par with Comet Azur, especially against large enemies with many hitboxes.
The Voidwalker pursues Astel, the malformed star capable of returning him to his distant home in the skies.
Where the mages of Caria draw their power from the moon and the stars, the Warriors of Light rely on their faith in the Greater Will, whom they deem to be the one true god. The Tree Sentinel, a heavily armored knight of gold, remains loyal to the Erdtree. At his side stands a knight of Leyndell, the Royal Capital, and a faithful member of the Golden Order. Together, the pair embark upon a pilgrimage with only one goal in mind: to see a chosen knight of the Two Fingers sit upon the Elden Throne and usher in an Age of Order. Marika thrust the world into chaos by shattering the Elden Ring. Now, the servants of the Greater Will work to reestablish the outer god's hold on the Lands Between.
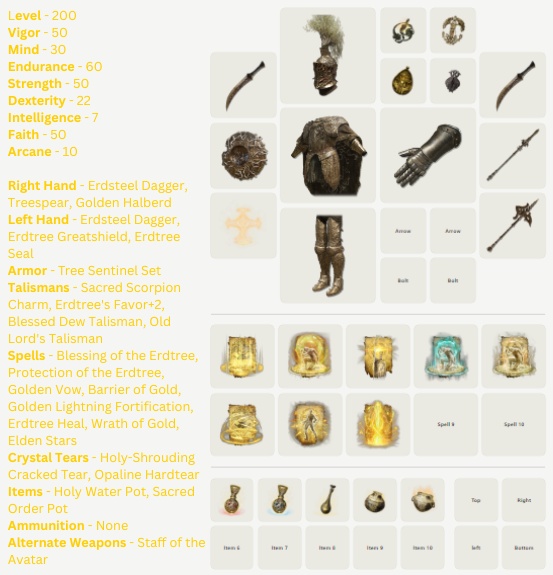
The Tree Sentinel, golden knight and stalwart of the Erdtree, is one of the more unique builds. Nearly unkillable, the sentinel uses a combination of heals over time, buffs, and defense to form an impenetrable wall between enemies and your allies. Equal parts Strength and Faith, the Tree sentinel dual-wields the Erdsteel dagger, a remnant of an age long past. The Erdtree Greatshield boasts excellent physical and holy resistance, as well as immovable stability, allowing him to defend heavy blows. Its weapon skill, Golden Retaliation, dispels sorceries and incantations, returning them to the caster in the form of a brilliant golden light. As with all weapons in its category, the Treespear is able to attack from behind the safety of the greatshield. As a two-handed weapon, the Tree Sentinel grips none other than the Golden Halberd, a staple of his order. Adding to the near invincibility, the Tree Sentinel Set boasts some of the best resistances in Elden Ring, along with immense poise for trading blows. It also looks really cool and makes for a great experience exploring the Land Between as a paladin.
In regards to talismans, the Tree Sentinel equips the Sacred Scorpion charm, increasing the holy damage of all equipped weapons and spells. Erdtree's Favor +2 gives a boost to health, stamina, and equipment load and adds to the roleplay aspect. The Blessed Dew Talisman supplies a passive heal over time effect, while the Old Lord's Talisman extends the duration of spells by 30%. The true strength of the Tree Sentinel lies in increasing the might of his allies. Blessing of the Erdtree, Protection of the Erdtree, and Golden Vow affect all those in the vicinity and stack with each other, granting healing over time, both elemental and physical resistance increases, and heightened attack power. Barrier of Gold and Golden Lightning Fortification can be swapped in against magic and lightning-specific enemies, and Erdtree Heal is great for use in between battles to conserve your allies healing flasks. If you are feeling more offensive, you can swap a talisman for Flock's Canvas Talisman and blast enemies with Wrath of Gold and Elden Stars.
The Tree Sentinel traverses the Lands Between, cleansing the Minor Erdtrees en route to the Mountaintops of the Giants, to guard the flame of ruin from those who would use it to incinerate the great tree.
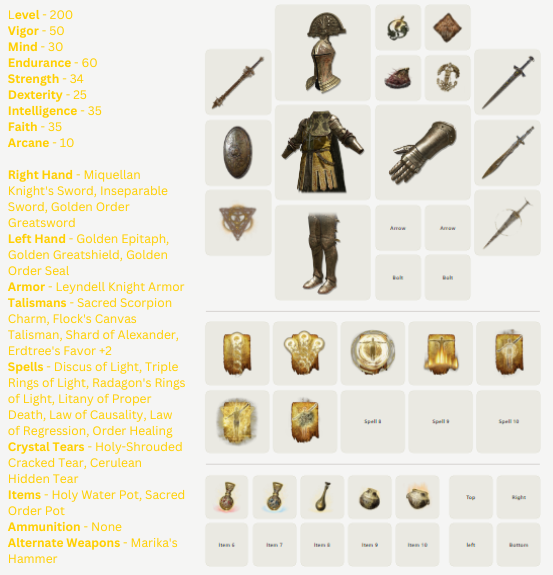
In contrast to the stalwartness of the Tree Sentinel, the Leyndell Knight is primarily an offensive build constructed to maximize the damage of Golden Order Incantations. The Leyndell Knight is a sword master, wielding the Miquellan Knight's Sword and the Golden Epitaph in unison. The Inseparable Sword, paired with the Golden Greatshield, has a unique fighting stance and was forged to hunt Those Who Live In Death. Finally, the Leyndell Knight is in possession of the Golden Order Greatsword, a legendary armament forged by Radagon to symbolize the tenets of the Golden Order. Its weapon skill, Establish Order, releases a golden explosion, sending out waves of light with repeated inputs. True to his name, he dons the Leyndell Knight Set, forever faithful to the Royal Capital.
Discus of Light and Triple Rings of Light are terrific ranged, high DPS options, and Radagon's Rings of Light function as a devastating AOE attack. The remaining incantations are situational, with Law of Regression likely the most useful in healing ailments such as poison and rot. Just take heed not to cast it after receiving buffs from the Tree Sentinel, as the incantation reverses all special effects, even beneficial ones.
The Leyndell Knight desires the preservation of the Golden Order, regardless of who sits upon the throne, out of both reverence and fear. There are far worse masters than the Greater Will.
zChosen knight of the Two Fingers and latest in a long line of Tarnished warriors to emerge from the Roundtable Hold. The Two Fingers Knight is meant to become Elden Lord, a last-ditch effort by the Greater Will to reestablish order in the Lands Between. In each hand, the knight holds the Cipher Pata, a fist weapon made up of pure white light capable of passing through shields as though they weren't there. Its weapon skill, Unblockable Blade, deals immense damage to single-target enemies, especially when supported by the correct talismans. The Coded Sword, sister weapon to the Cipher Pata, provides a similar weapon skill, attacking in a sweeping motion instead of a forward lunge. With the blade, the Two Fingers Knight wields the Manor Towershield, depicting a figure from the Roundtable Hold. The Sacred Relic Sword, obtainable only after beating the game, is a weapon of awesome power, fitting for the warrior meant to lead the coming age. Wave of Gold, its weapon skill, emits a sweeping surge of light that decimates all enemies in its path. Staying true to his nature, the knight dons the Fingerprint Set, the armor once belonging to Vyke, the greatest of the Two Fingers Knights.
The talisman setup is fairly balanced. with the Sacred Scorpion Charm and Shard of Alexander boosting damage output and the Greatshield Talisman allowing improved blocking. Additionally, the Curved Sword Talisman enhances guard counters, encouraging a true knightly playstyle with a combination of sword and board. As for spells, the various fortification incantations provide a range of elemental buffs specific to each element. Just beware that they are body buffs and will override Protection of the Erdtree from the Tree Sentinel, so only use them against enemies you know deal the respective element. The Two Fingers Knight also possesses a few healing incantations as well as Lord's Aid, which alleviates poison, blood loss, and sleep for the group.
The Two Fingers Knight is the latest in a long line of Tarnished warriors attempting to repair the Elden Ring. Perhaps he will be the exception.
5. The Three Flames
The Flame of the Fell God lays dormant in the Mountaintops, but embers from several malevolent fires flicker throughout the Lands Between. Volcano Manor, perched atop Mt. Gelmir, is home to the Magma Mage, a pyromancer who has discovered a method to channel the molten inferno through the use of sorcery. He has found an ally in the Godskin Apostle, worshipper of the Gloam-Eyed Queen and wielder of the dreaded god-killing Black Flame. They are led by a being that is rage incarnate: the Mad Pyromancer, harbinger of the Frenzied Flame. His mind has been corrupted by the words of Shabriri, allowing the outer god of chaos to use him as a tool to bring calamity upon the world.
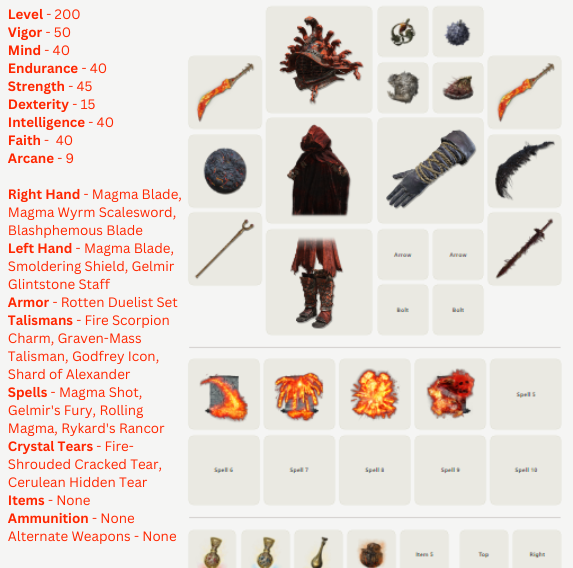
The Magma Mage is said to be as brilliant as he is cruel. Creator of Magma Sorceries, he is the first individual to learn how to channel fire through study as opposed to prayer. He dual-wields the Magma Blades, a curved sword burning with the lava of Mt. Gelmir. Magma Shower, its weapon skill, sends the player into a spinning motion, leaving lava on the floor for DOT fire damage. The Magma Wyrm Scalesword, a weighty, curved greatsword clutched by the failed dragons, works well as a counterattack option with the wicked-looking Smoldering Shield. Its weapon skill, Magma Guillotine, has the player smash the weapon into the ground, generating a devastating magma blast. The Blasphemous Blade, the sacred sword of Lord Rykard, can melt multiple targets simultaneously with its Taker's Flames weapon skill, all while restoring health with every slain enemy. The Gelmir Glintstone Staff, one of the few catalysts that scale with both Faith and Intelligence, provides an innate boost to Magma Sorcery scaling. The Rotten Duelist Set doesn't actually have anything to do with magma lore-wise, but it looks so awesome we are going to allow it just this once.
The Godfrey Icon is essential for charged spells, namely Magma Shot and Rolling Magma. Rykard's Rancor, the Magma Mage's strongest spell, is tricky to utilize effectively, but the damage done when used correctly is enough to strike fear in even the Lord of Blasphemy.
Along with his Lord Rykard, the Magma Mage has committed the sin of blasphemy and now works against the followers of the Greater Will and the Erdtree in any way possible.
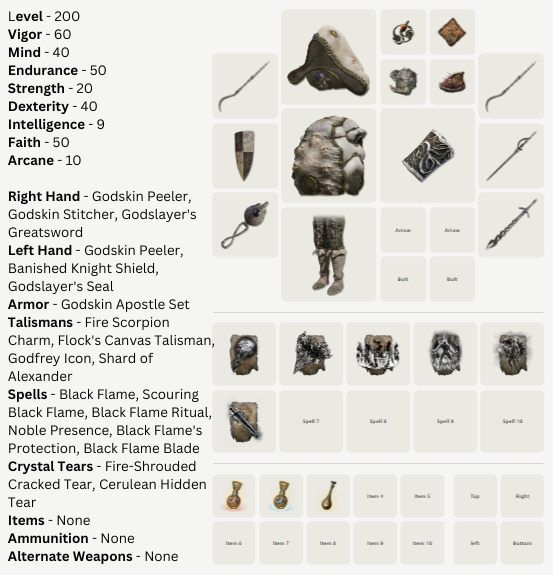
Clad in the robes of the Gloam-Eyed Queen's chosen apostles, the wielder of the god-slaying Black Flame uses Dexterity and Faith for a barrage of skillful weaponry and wicked pyromancy. The Godskin Peeler's jump attack deals superb damage when dual-wielded, and Black Flame Tornado is an excellent option for both large groups and slower bosses. Alternatively, the Godskin Stitcher and Banished Knight Shield are the superior options for one-on-one combat with heavy-hitting humanoid enemies. But the storied weapon of the Godskin Apostle remains the Godslayer Greatsword. Wielded in battle by the Gloam-Eyed Queen in days past, this legendary armament is the only colossal sword that scales well with Dexterity. When held with both hands, its raw damage is on par with that of other weapons in its category. What sets it apart is its weapon skill, The Queen's Black Flame. Unique to the Godslayer Greatsword, this thing hits like an absolute truck, has amazing reach, poise damage, and stellar guard break potential. It is paired with the obsidian-coated Godslayer's Seal, enhancing the power of all equipped incantations.
The Godfrey Icon augments the power of your charged Black Flame Sling incantation. Black Flame's Protection will likely be your second most frequently used incantation, increasing physical defense at the cost of reduced flask healing.
Though the Gloam-Eyed Queen has perished, the Godskin Apostle continues to plot the demise of the gods.
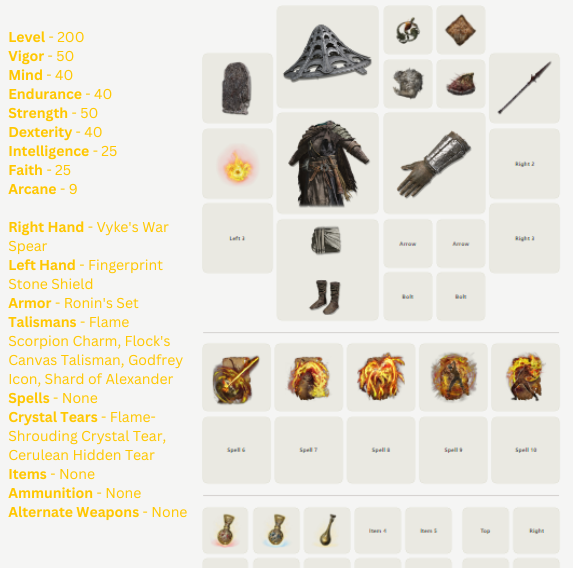
Emboldened by madness-fueled dreams and the chaotic ambitions of the Frenzied Flame, the Mad Pyromancer is the bane of the Lands Between. Destined to take his place as Lord of Frenzied Flame, he is whispered of in legend as one who will bring calamity upon the world and eliminate life itself. He wields Vyke's War Spear, the lone weapon in the world corrupted by the Flame of Frenzy. Its weapon skill, Frenziedflame Thrust, plunges the spear into the ground, creating an explosion of maddening molten fire. With strength enough to carry the Fingerprint Stone Shield, this build boasts the best guard boost in Elden Ring. In addition to these forsaken armaments, the Mad Pyromancer harnesses the Frenzied Flame Seal, bestowed on him by the maiden of the Three Fingers. This is the only seal in the game that scales with all four of Strength, Dexterity, Intelligence, and Faith. Naturally, it gives an innate boost to the damage of Frenzied Flame Incantations.
Speaking of, the molten yellow magic is loads of fun to play with. Frenzied Burst has insane range, rivaling that of bows with vastly better damage output. The Flame of Frenzy and Unendurable Frenzy are great close-range AOE options, with the latter continuing until the player runs out of stamina or FP. Howl of Shabriri is a high-risk, high-reward body buff with many different effects. To begin, it grants the user a 25% damage buff along with a 30% increase in damage received. Additionally, it causes severe madness to the user and enemies around them. Unfortunately, the madness status effect is extremely niche, only affecting invaders (both NPCs and other players) along with a grand total of three humanoid enemies. Its most significant use by far is the damage increase, although the initial shriek deals a tiny bit of damage an
\d is helpful in staggering groups of smaller foes in tight spaces.
Following the words of Shabriri, the Mad Pyromancer would use the yellow Flame of Frenzy to burn the world to the ground, leaving nothing but ash in its wake. May chaos take the world!
Stepping away from apocalyptic delusions for a moment, the Village Remnants possess very little in terms of magical abilities. Instead, this collection of common tradespeople wanders the Lands Between with a singular goal in mind: to survive. A daring engineer, a brilliant alchemist, and a rugged miner struggle to endure after their village is burned down by the Flying Dragon Agheel. Once, they employed their talents for the betterment of their community. Now, they have altered their crafts to become killing machines, using them to even the playing field in a hostile land filled with monsters and magical beings. Explosive masses of rock, deadly poisons, and ingenious devices of war await any who wish to bring harm to the Village Remnants. They are loyal to no god, instead finding trust in each other, as the followers of the deities had squandered theirs long ago. They begin their journey in southern Limgrave, where they seek revenge on the dragon who destroyed their home. After that, they will go where the wind takes them, wandering, searching for a new home where they can settle down and rebuild the one they lost. Rumors of a haven built by a rogue demigod reach their ears. A haven for the generations displaced by the aftermath of the Shattering. They travel to the far north, to the snow-laden lands of the giants, in search of Miquella's fabled Haligtree.
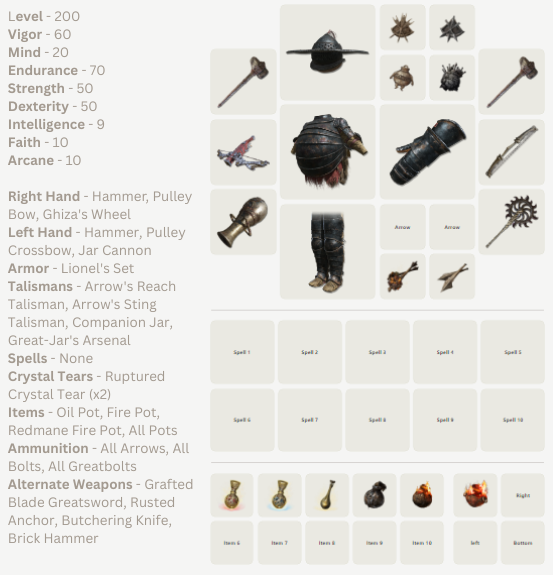
Known among the villagers for his ingenious and oftentimes dangerous experiments, the Engineer is famous among locals for having designed Stormveil Castle. Now, the Engineer has turned his trusty blacksmith's hammers into the weapons they once forged. For long-distance enemies, the Pulley Bow and Pulley Crossbow are technologies far ahead of their time. Use the bow in the open world and vast areas, and the crossbow in caves, dungeons, and other medium-range areas. But the Engineer's Jar Cannon dwarfs all ranged armaments in terms of sheer destruction. Inspired by the Engineer's desire to create a weapon that could take down a dragon, it is best paired with explosive greatbolts and deals significant AOE fire damage from a distance. Perhaps the Engineer's greatest innovation, however, is Ghiza's Wheel. A variation of the torture devices used by the Recusants of Volcano Manor, the razor-sharp blades tear through enemy flesh, causing swift blood loss on top of the standard damage expected of a colossal weapon.
The Engineer has also developed a series of throwing pots. Specifically, the Oil Pot decreases an enemy's resistance to fire damage, improving the damage of the Jar Cannon and Redmane Fire Pots. All three ranged weapons are bolstered by the Arrow's Sting Talisman, while its cousin, the Arrow's Reach Talisman, decreases damage falloff from a distance. The Companion Jar Talisman further reinforces the Engineer's throwing pots, and the build's required equipment load is reached with the help of the Great-Jar's Arsenal. You can also replace a talisman with the Fire Scorpion Charm or Shard of Alexander for further damage, depending on whether a bow, throwing pot, or weapon skill is more useful for the situation.
While taking inspiration from the great Iron Fist Alexander, the Engineer longs to lay eyes upon the sacred structure acting as a brace for the Haligtree. It is said that Elphael is a marvel of modern architecture, a sight that any smith worth his iron would wish to witness before they pass from this world.
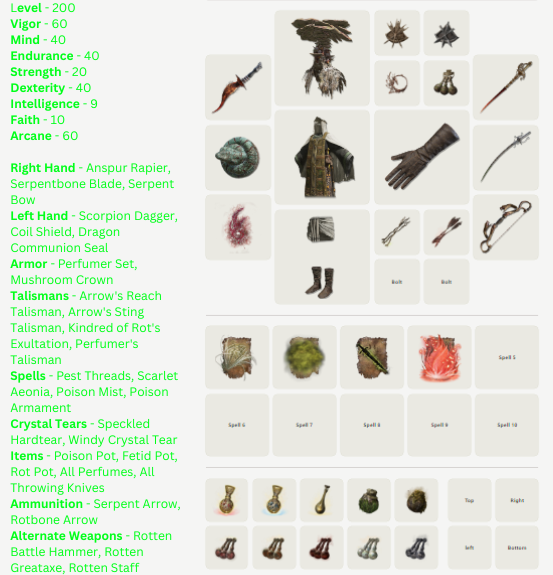
The Alchemist was known among many as a healer and a pacifist who detested war. She is a genius at her craft, taking only days to craft a cure for a local plague, terminating it before it could spread and saving hundreds of lives in the process. Time has transformed her into a worthy killer, forcing the Alchemist to exchange her life saving potions for deadly venoms and poisons. When entering a boss fight, her goal is to inflict both Scarlet Rot and Poison as quickly and efficiently as possible. This build excels against bosses with large health pools, dealing potent damage over time with the two draining status effects. The Alchemist wields a thrusting sword and a dagger crafted for her by the Engineer, with the knife originating from the tail of a great scorpion and the blade stemming from the spur of a giant ant. Both weapons are infused with Scarlet Rot, and the rapier can additionally be infused with poison, making it practical to inflict both simultaneously. The Scarlet Rot will likely proc first, after which the Alchemist switches to her Serpentbone Blade and Coil Shield. The Katana inflicts a unique type of poison called Deadly Poison, dealing less total damage but cutting the time it takes to wear off in half. If timed properly, the Deadly Poison will wear off roughly around the same time as the Scarlet Rot, allowing the Alchemist to repeat the two in unison. This cycle can be used to maintain the attack boost of the Mushroom Crown and Kindred of Rot's Exultation talisman. Additionally, the Serpent Bow, paired with its signature arrows, helps the Alchemist get a head start on the poison and rot buildup.
Along her journey, the Alchemist picks up several incantations derived from the fearsome demigod Malenia. The Pest Threads have great tracking and are a good physical damage option for enemies that are immune to status effects. Poison Cloud is effective at inflicting poison in large groups. Scarlet Aeonia applies a stronger version of Scarlet Rot, with respectable initial damage as well. The Alchemist has worked tirelessly to master the art of the Perfumers. Her various aromatics give her access to increased attack and defense and, much to the dismay of the Engineer, inhuman abilities such as temporarily turning her body into steel.
While her companion longs to study Elphael, the Alchemist pursues the roots of the Haligtree itself, where the Empyrean Malenia, envoy of Rot, is said to lay in a millennia-long slumber.
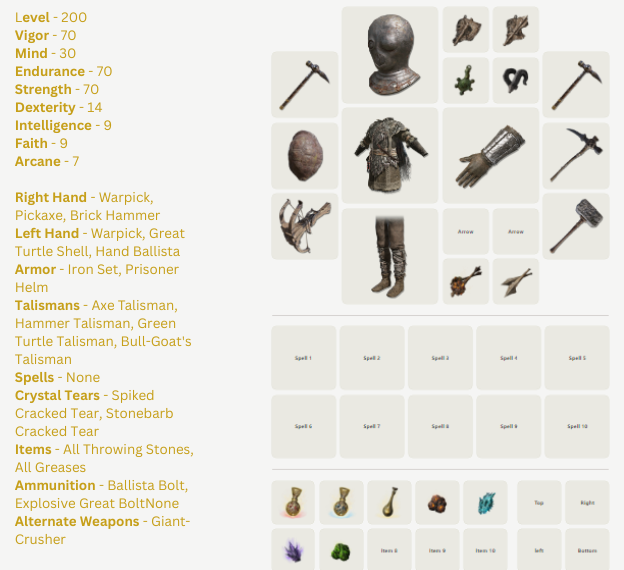
Hundreds of feet beneath the world's crust, the enslaved Miners work tirelessly to unearth valuable smithing stones for the masters of Limgrave. After leading a revolt against the elite, his pickaxes, both large and small, now spend their time imploding armor and crushing bones. The Great Turtle Shell provides a passive stamina boost, indicative of the enormous amount of stamina demanded of all miners. The Brick Hammer, a crude weapon once used as a smashing tool, boasts some of the best Strength scaling in the game and excels when held in both hands. The Miner specializes in charged heavy attacks and stance breaking, and that is reflected in both his choice of weapons and talismans.
He knows not a single spell, instead relying on throwing stones for elemental damage. The Explosive Stone Clumps, used in the past to blast rocks, deal heavy AOE fire damage, while their poisoned variant was essential for pest extermination. Their labors led to the discovery of Glintstone Scraps; unstable shards of the alien rock that produce a magical bolt when broken. Then, the skies blessed them with yet another gift: the Gravity Stone Fan, an ancient relic of the Onyx Lords that emits gravitational shockwaves in the area around the caster. As mentioned previously, the Axe Talisman enhances the Miner's charged heavy attacks, while the Hammer Talisman improves guard break ability against shielded foes. Similar to his shield, stamina recovery is further maximized by the Green Turtle Talisman, while the increased poise from the Bull's Goat Talisman ensures the charged attacks won't be interrupted.
The Miner joins the Engineer and Alchemist partly out of necessity, but legends of Miquella's horde of Ancient Dragon Smithing Stones secretly pull him to the fabled Haligtree.
Several assassin organizations dwell throughout the Lands Between's shadows. These three rogue individuals have each committed grave betrayals worthy of exile and have brought their blades together in hopes of redeeming themselves in the eyes of their superiors. The Black Knife Assassin, whose blade was the first to strike Godwyn the Golden, was exiled for turning in Ringleader Alecto in exchange for her own freedom. In her company is the Confessor, a shadowy assassin of the Two Fingers, was banished from the Roundtable Hold for aiding Vyke the Dragonspear in committing the cardinal sin of burning down the Erdtree. The Sanguine Noble represents the bloody assassins of Mohg, exiled from the insane cult for murdering White-Mask Varre, the Lord of Blood's chosen disciple.
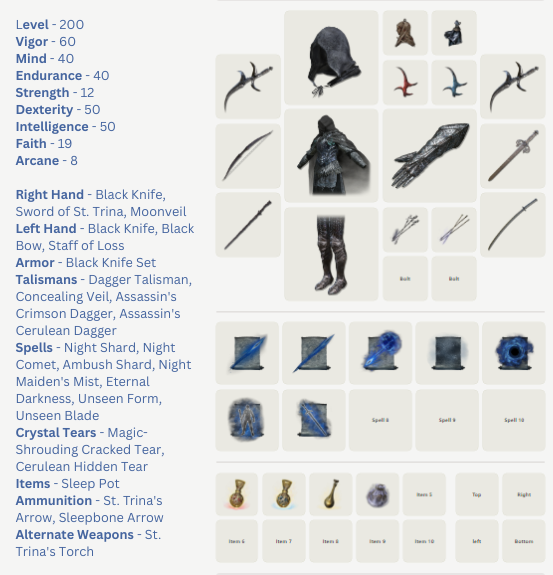
Hailing from far beneath the earth, in the underground city of Nokron, the Black Knife Assassin employs a combination of shadowy sorcery to dispatch foes swiftly and silently. Imbued with the Rune of Death, her twin Black Knives do tons of critical damage, encouraging constant backstabs against enemies of human build. Blade of Death, its weapon skill, fires a projectile that deals holy damage while decreasing total HP for some time. As a note, the skill scales purely with Faith, and since this build is Intelligence-based to take advantage of the Night Sorceries you may find Blade of Death underwhelming. That said, its dual-handed moveset for the times you are discovered contains excellent damage output due to the Dexterity scaling. The Sword of St Trina is one of the two weapons in the game that applies the ultra rare sleep status effect. Sleep has the potential to trivialize large stretches of a dungeon, allowing her to reach the boss room unharmed like a true assassin would. The Black Bow in unison with St Trina's Arrows apply sleep from a distance as well as solid preliminary damage when paired with the correct elemental arrows. Obviously, you can't assassinate most bosses, which is where the Moonveil katana shines brightest. Crafted from a master swordsmith in the town of Sellia, it scales well with both dexterity and Intelligence, offering stellar damage output with an awesome weapon skill to boot, and it causes blood loss. The Staff of Loss, its traditional glintstone absent from its point, increases the power of the Night Sorceries learned in the Eternal Cities.
The Black Knife Assassin has three main tools to ensure she goes unnoticed. The first is her armor, which nullifies noise completely, allowing her to move silently throughout a dungeon. There is also the Concealing Veil, a talisman that grants complete invisibility when crouching from a distance. The talisman works well with the Unseen Form sorcery, granting a layer of semi-invisibility at all times, regardless of crouching or distance. The Dagger Talisman enhances the many critical hits the Black Knife Assassin will deliver, while the Assassin's Crimson and Cerulean Dagger Talismans restore HP and FP for every critical hit. In terms of damage spells, Night Comet and Night Maiden's Mist are your bread and butter. Feel free to switch to a classic sorcerer set up against bosses that do not take critical hits, or just tough bosses in general.
The Black Knife Assassin searches for the Liturgical town of Ordina, deep within the Consecrated Snowfields, where she might free her imprisoned sisters from the evergaol that binds them.
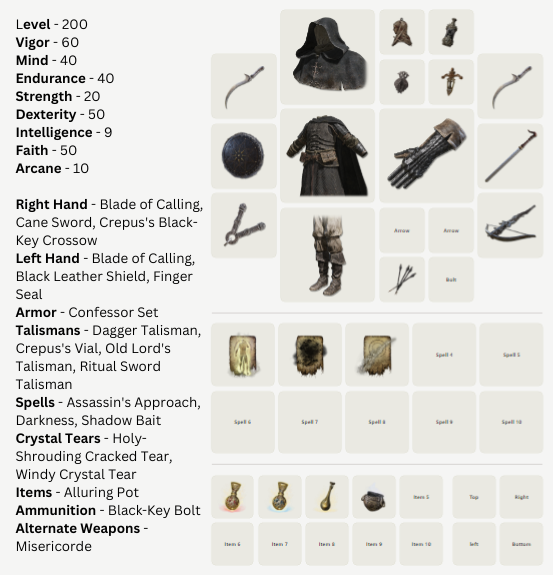
Once functioning as an assassin who silently dispatched those who opposed the Two Fingers, the Confessor has his own methods of traversing the shadows unnoticed. The Blade of Calling is essentially the Black Knife prior to the infusion of Destined Death. It too has excellent critical damage, with high Faith and Dexterity scaling. Crepus's Black-Key Crossbow is effective in producing Scarlet Rot, although you can also consider using Sleepbone bolts to aid in the Black Knife Assassin's sleep buildup. Of course, an assassin-priest of the Roundtable would make use of the Finger Seal, which is used to cast various Two Fingers Incantations.
Incapable of any form of invisibility, the Confessor relies on sound manipulation to catch enemies unaware. Assassins' Approach silences all footsteps and negates fall damage, and Darkness creates a veil of shadows that blinds enemies, resetting their aggression. Shadow Bait creates a pale gold specter, luring in foes of human build and leaving them open for a backstab. In combination with the Black Knife's shadowy sorcery, the Assassins will only rarely be forced to engage in hand-to-hand combat, conserving precious healing flasks for the boss fight. Like the Black Knife, the Confessor equips the Dagger Talisman, increasing critical attack power. In addition, Crepus's Vial eliminates all sound, and while it doesn't stack with Assassin's Approach, it is nice not having to constantly reapply the effect. You can always opt to use the incantation and exchange the talisman for another.
The Confessor travels to the Mountaintops of the Giants in search of Vyke's prison. He intends to free the renowned Tarnished champion, and finish what they started together so many years ago.
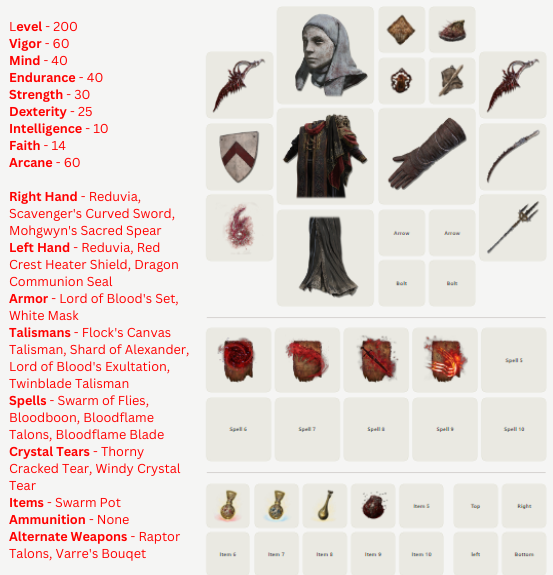
Formerly serving as the high priest of the Bloody Fingers, the Sanguine Noble represents a more vicious form of assassination. No invisibility; no sound manipulation; no sneaking. The Sanguine Noble murders in cold blood, enjoying the terror in his targets eyes as they promptly bleed to death. Twin Reduvia Daggers rip through flesh, and its weapon skill slings the blade's perpetually flowing blood outward towards his target. The Scavenger's Curved Sword is a brutal weapon, with the notches traveling down the blade and causing blood loss with excellent efficiency. Prior to his banishment, the Sanguine Noble stole Mohg's Sacred Spear, a weapon of awesome power and an instrument of communion with the Formless Mother. Bloodboon Ritual, its weapon skill, deals immense AOE damage around the caster, in addition to incredible bleed buildup. The Dragon Communion Seal technically isn't meant for Blood Incantations. However, it is the best Arcane scaling seal in the game, and its red tint goes well with the Lord of Blood's Set.
The Sanguine Noble utilizes the Blood Incantations native to the denizens of Mohgwyn Palace. Swarm of Flies provides a constant, long-distance source of bleed buildup, while Bloodboon scatters Bloodflame across the ground.
The Sanguine Noble seeks the old paths to Mohgwyn Palace hidden deep within the Consecrated Snowfields. He would slay the Lord of Blood himself and offer up his soul to the Formless Mother.
The Crucible is defined as the primordial form of the Erdtree and the source of all natural life in the Lands Between. Prior to the age of Marika and her Golden Order, the mark of the Crucible was seen as a divine blessing. Misbegotten, Omen, beasts, demi-humans, and even dragons emerged from the primordial tree. Legend has it that the Crucible was to the dragons what the Erdtree is to the humans. Seeking to further understand the Crucible, the Drake Knight became the most fearsome dragonslayer in human history. He feasts on the hearts of dragons so that he might transform his own flesh into that of the ancient stone beasts. A pair of Crucible Knights pledge their blades to the Drake Knight. Known as Aspects of the Crucible, these twin warriors are children of Ordovis and Siluria and are capable of manifesting the Great Tree's primal energies in battle. The trio scour the Lands Between in search of the sixteen Knights of the Crucible, gathering support for an assault on the Royal Capital. Marika and the Elden Beast must fall so that the natural order may be restored.
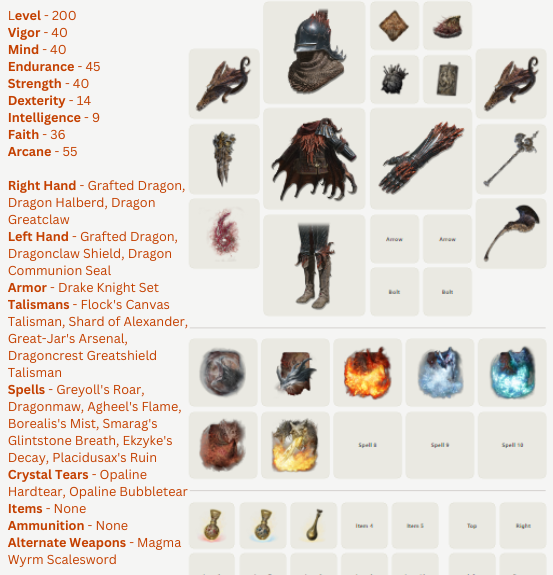
The most famous dragonslayer in the history of the Land's Between, the Drake Knight has taken inspiration from Godrick the Grafted, attaching a pair of dragon heads to his arms. The Grafted Dragon still contains part of its original power and is capable of spouting fire from its mouth. The Dragon Halberd, taken from the failed attempt at dragon creation by the Nox, contains the strength of ice lightning within its metal core. The Drake Knight's axe and shield are whittled from the claw of a mighty dragon and taken as both a prize and proof of slaying.
The Drake Knight's weapons are mighty, but his Dragon Communion Incantations give him power equal to that of the demigods. Greyoll's Roar, learned from the mother of all dragons, simultaneously reduces the attack and defense of nearby enemies while doing great AOE damage and knockback. Dragonmaw, one of the first incantations taught to Dragon Communion Disciples, deals immense physical damage and has high hyperarmor. Additionally, the Drake Knight is capable of emitting a variety of elemental breath attacks, absorbed by devouring the hearts of Agheel, Borealis, Smarag, Ekzyke, and the Dragonlord Placidusax. The talismans are fairly standard, with the Great-Jar's Arsenal providing a much-needed boost in equipment load.
The Drake Knight hunts the Dragonlord Placidusax, the first of the dragons. Only when he has feasted upon the heart of the five-headed dragon can he truly understand the inner workings of the Crucible.
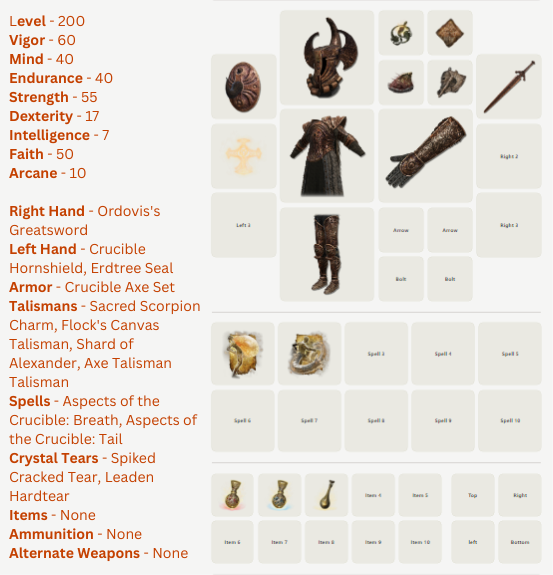
Descending from his father's line of warriors, the Ordovian Crucible Knight carries his Ordovis' greatsword to battle, determined to reforge the order he once led. The greatsword deals hefty damage on a Strength/Faith build, and its weapon skill slams the weapon into the ground in a mighty vortex. The Crucible Hornshield possesses some of the highest defense stats in the game, and its shield bash skewers enemies, dealing damage on par with some weapons.
The Ordovian Crucible Knight also wields the Erdtree Seal, useful for casting the Aspect of the Crucible Incantations. The primordial magic allows the knight to spew fire as well as create a beastly tail to swing towards foes in a sweeping motion.
The son of Ordovis seeks battle with Godfrey, who abandoned the Crucible to become Marika's First Elden Lord.
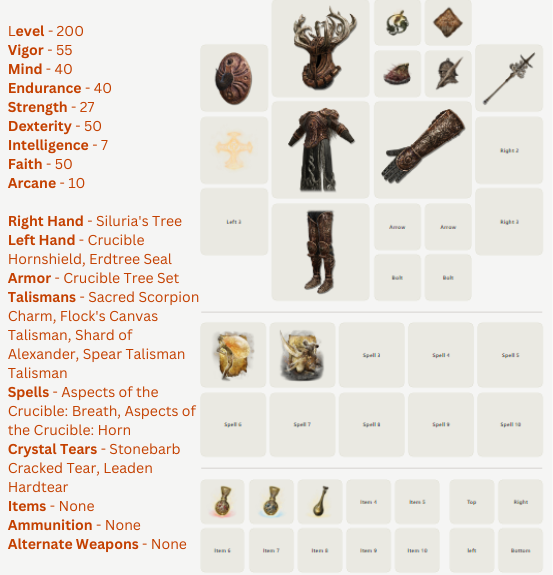
Helmet adorned with bark from the Great Tree, the Silurian Crucible Knight descends from her mother's line of warriors. Like her brother, she wields the Crucible Hornshield and Erdtree Seal. Unlike the knight of Ordovis, she carries Siluria's Tree into battle, a great spear that she uses to project a golden vortex into foes. While the twins share the Crucible's flame breath, only Siluria is capable of conjuring a beastly horn to gore enemies in quick succession.
The Silurian Crucible Knight seeks battle with Radagon, Marika's Second Elden Lord, who oppressed the Crucible's children at every turn.
I would like to thank you very much for taking the time to read this article. Hopefully you found at least one squad that you and your friends would enjoy a playthrough with in anticipation of the Shadow of the Erdtree DLC. Keep a special eye out for my "Who Would Win In A Fight?" series, which will feature two characters from any form of media in a fight to the death, written in short story form. Adios for now, and remember to stay cool, whatever cool means for you!


Share Post